What Is Screen Printing? A Step-By-Step Guide (With Pictures)
Screen printing is one of the oldest and most popular methods for transferring images onto garments. It has been used to produce everything from t-shirts, hoodies, bags and hats, to posters, prints and other wall art. After running a screen printing company for over a decade, we like to think we know a thing or two about it. In this blog we will discuss what screen printing is, different types of styles, step by step guide on how to do it yourself, what equipment you need, as well as a brief history of how it all came about. So let’s get started!
What is Screen Printing?
In basic terms, screen printing is the process of transferring ink onto a substrate through a woven mesh and/or stencil using a squeegee. Although fabric and paper are the most frequently printed surfaces, this technique can also be used to print a wide range of materials including metals, plastics, wood and glass. Here at Flood we mainly print fabrics.
Screen printing is still the most widely used technique for printing garments because of the wide range of vibrant colours available and ease of printing large quantities even on dark fabrics. Special effects inks and techniques can also be utilised to produce some really eye catching finishes.
Although each colour within a design generally needs a separate screen, there are some methods of reproducing very colourful artwork reproductions with a limited number of screens.
Expert graphics separation techniques, (paired with the right meshes, inks and a skilled printer) can produce amazing results.
Screen Printing Styles
The main styles or processes of screen printing on garments include:
Spot Colour Screen Printing: usually blocks of colour used to print vector artwork without too much detail.
Halftone Printing: small dots of varying sizes simulating a gradient or shading in the artwork.
Grayscale Printing: uses halftones in one or more shades of grey to produce detailed black and white images.
Duotone Printing: similar to sepia photography prints, this method uses a black ink plus another colour to produce tonal artist style prints.
CMYK (4 Colour Process Printing): Cyan, Magenta, Yellow and Black are used to produce a full colour image. Mostly used on white or very light garments.
Simulated Process Printing: can be used on light or dark garments and usually includes anything from 3 to 14+ colours. This is a very versatile and accurate method used in the reproduction of photorealistic designs and artwork with lots of detail/colours.
Special Effects: can be used to produce high build, puff, glitter, metallic and gloss designs to name a few.
Step-By-Step guide to Screen Printing
Step 1: Artwork/Logo/Design
All great screen prints (or any print for that matter) start with great artwork. The design itself is not necessarily important but the quality of the digital image most definitely is. We recommend either a vector file, or a high resolution raster image (300ppi minimum resolution) at finished print size. If the image quality is low then it’s almost certain the final print won’t be as high standard as it should be. There are lots of ways to transfer the image to a screen, but the most popular is to print out positive film and expose the emulsion with UV light. This is how the stencil is created.
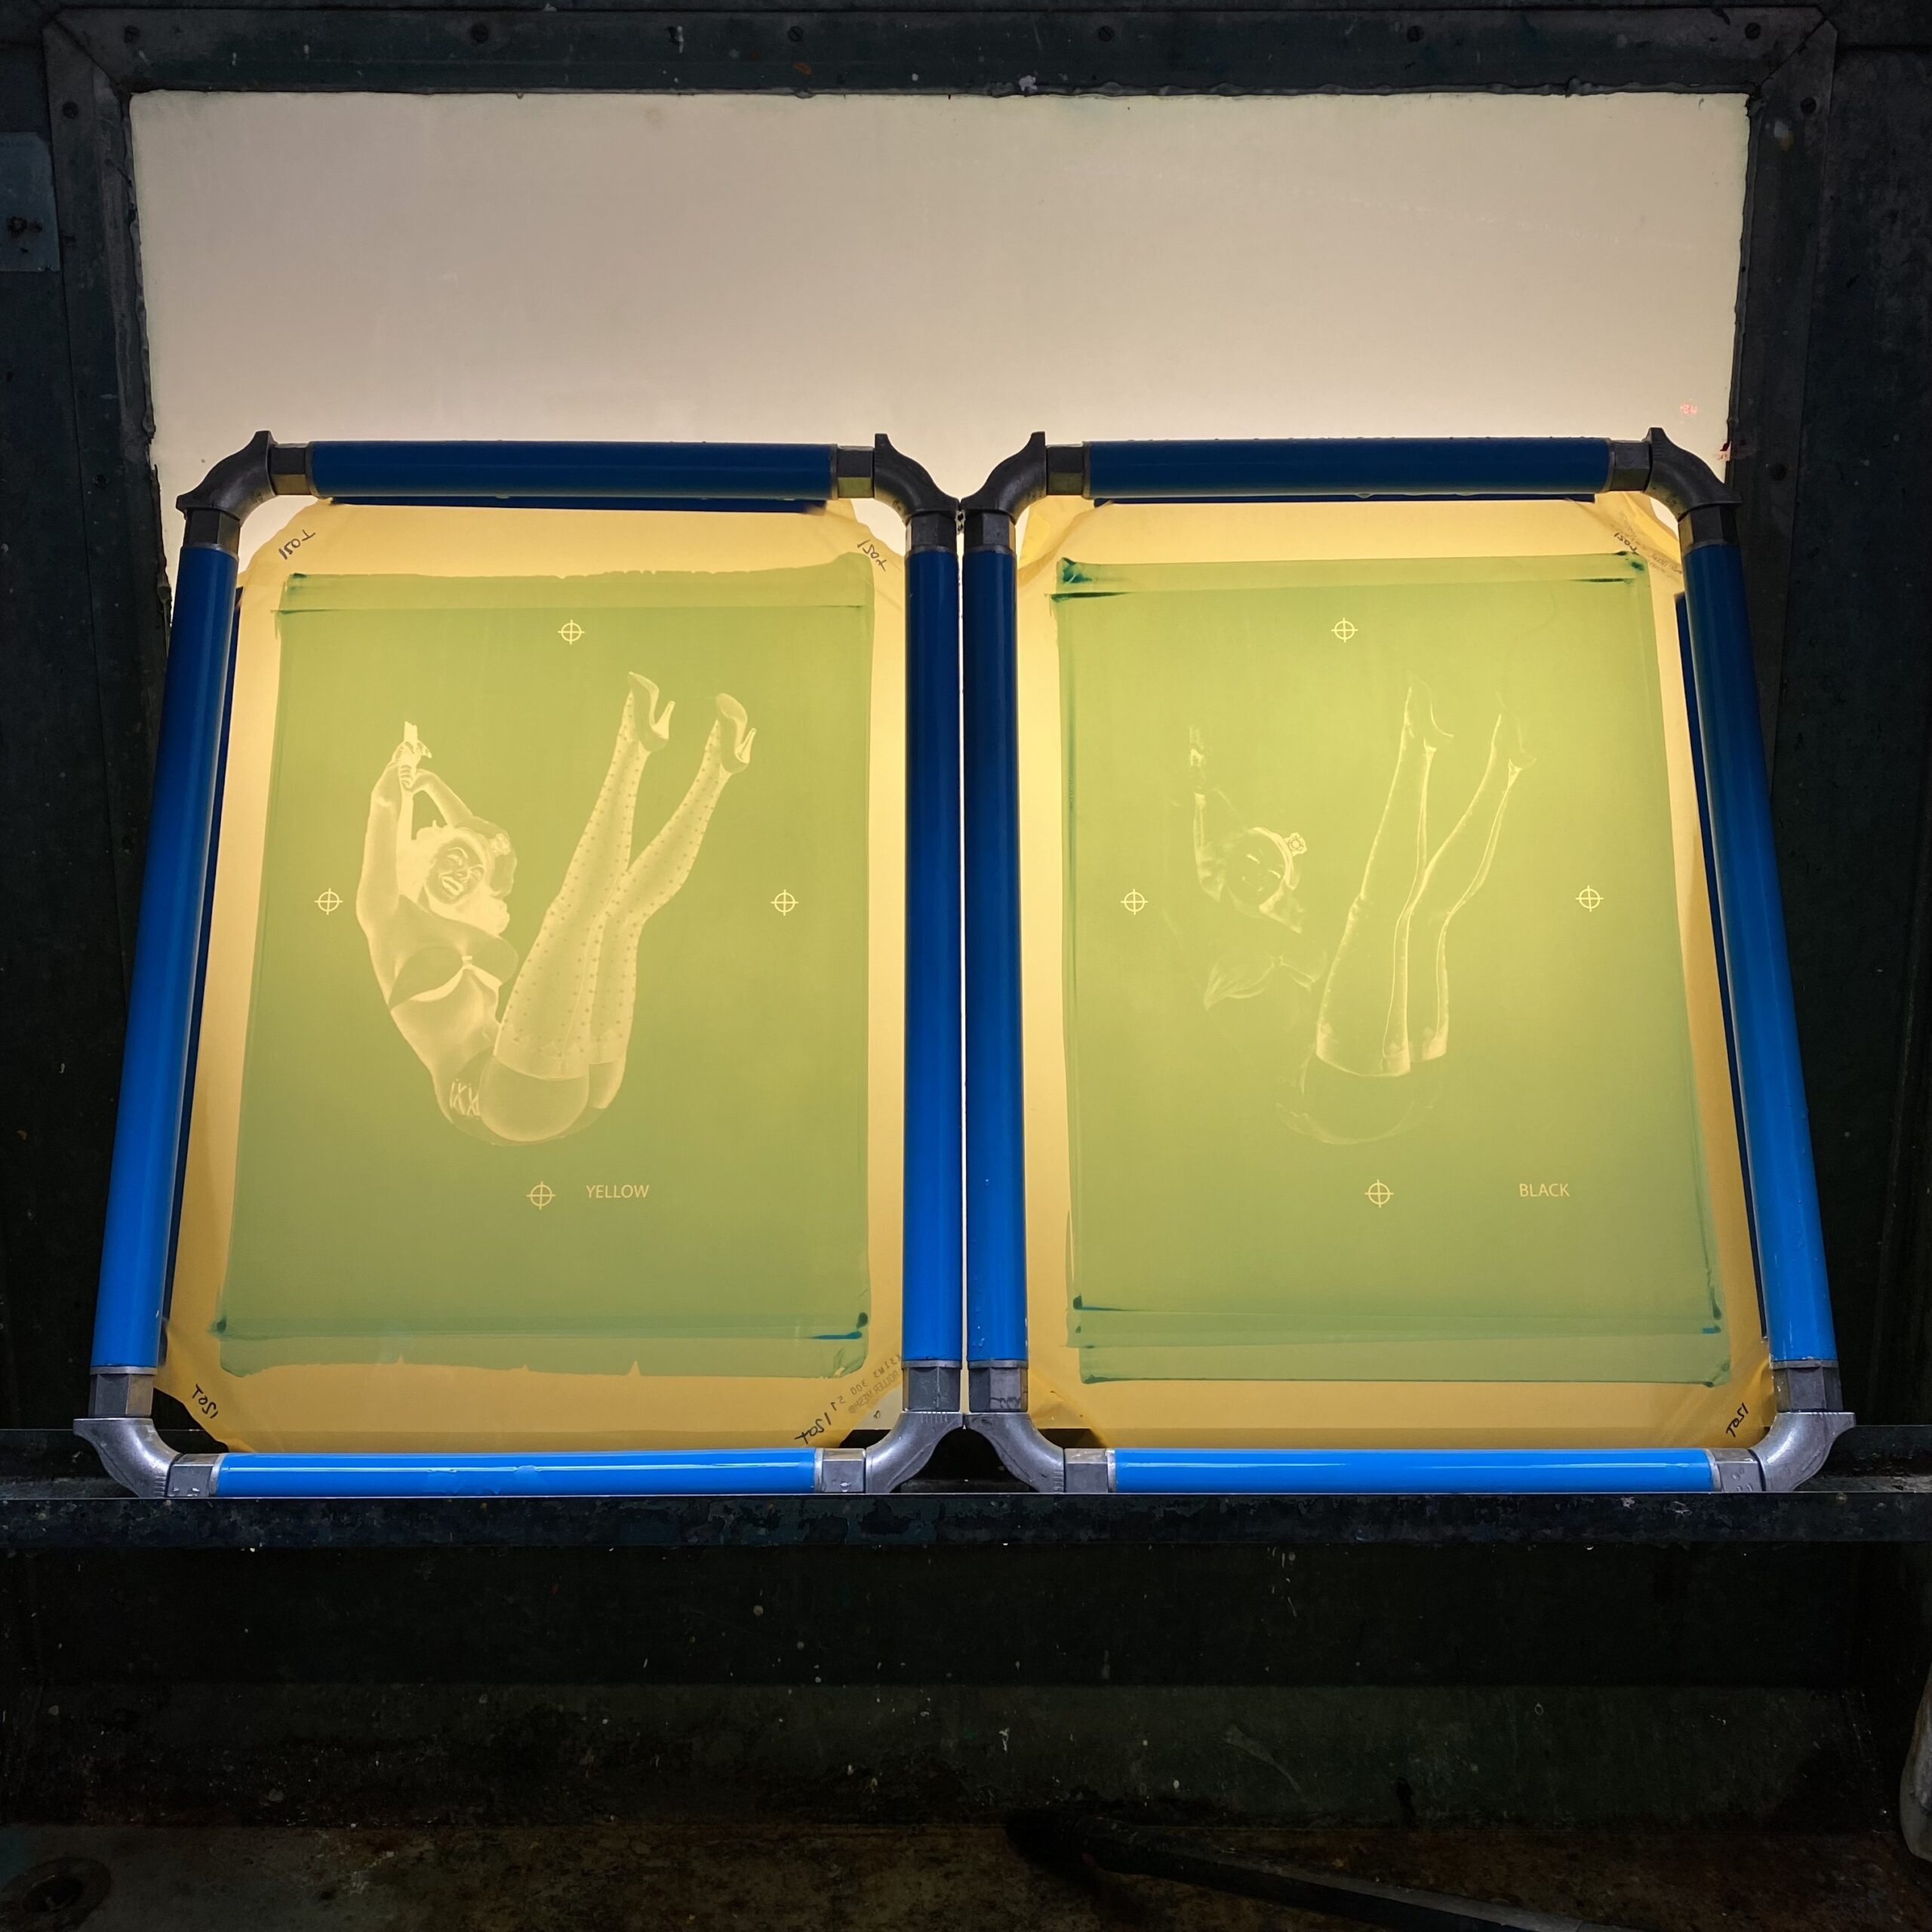
It’s worth remembering that each colour within your design requires a screen of it’s own (in most cases). For that reason, you may want to think about this at the design stage, especially if you’re working to a budget or the quantities required are low (20-50pcs). Once you’ve sent your design to us, we can look over it and either provide a quote or recommend an alternative print method (DTG or DTF) if we think it’s more suitable.
If your design is a single colour print then things are relatively simple. If your design has multiple colours then it will need to be separated by us in a graphics program and then ‘put back together’ on press.

Step 2: Choosing, Preparing and Coating Screens with Emulsion
In order to transfer your design to garments or bags, we have to use a screen, or a number of screens to produce stencils. Once we know that each colour in the design requires a separate screen, it’s time to choose the correct mesh. This will depend on the type of ink being used, the garment being printed and the amount of detail within the design. Meshes range from coarse (thick inks) to very fine (thinner inks and fine detail).
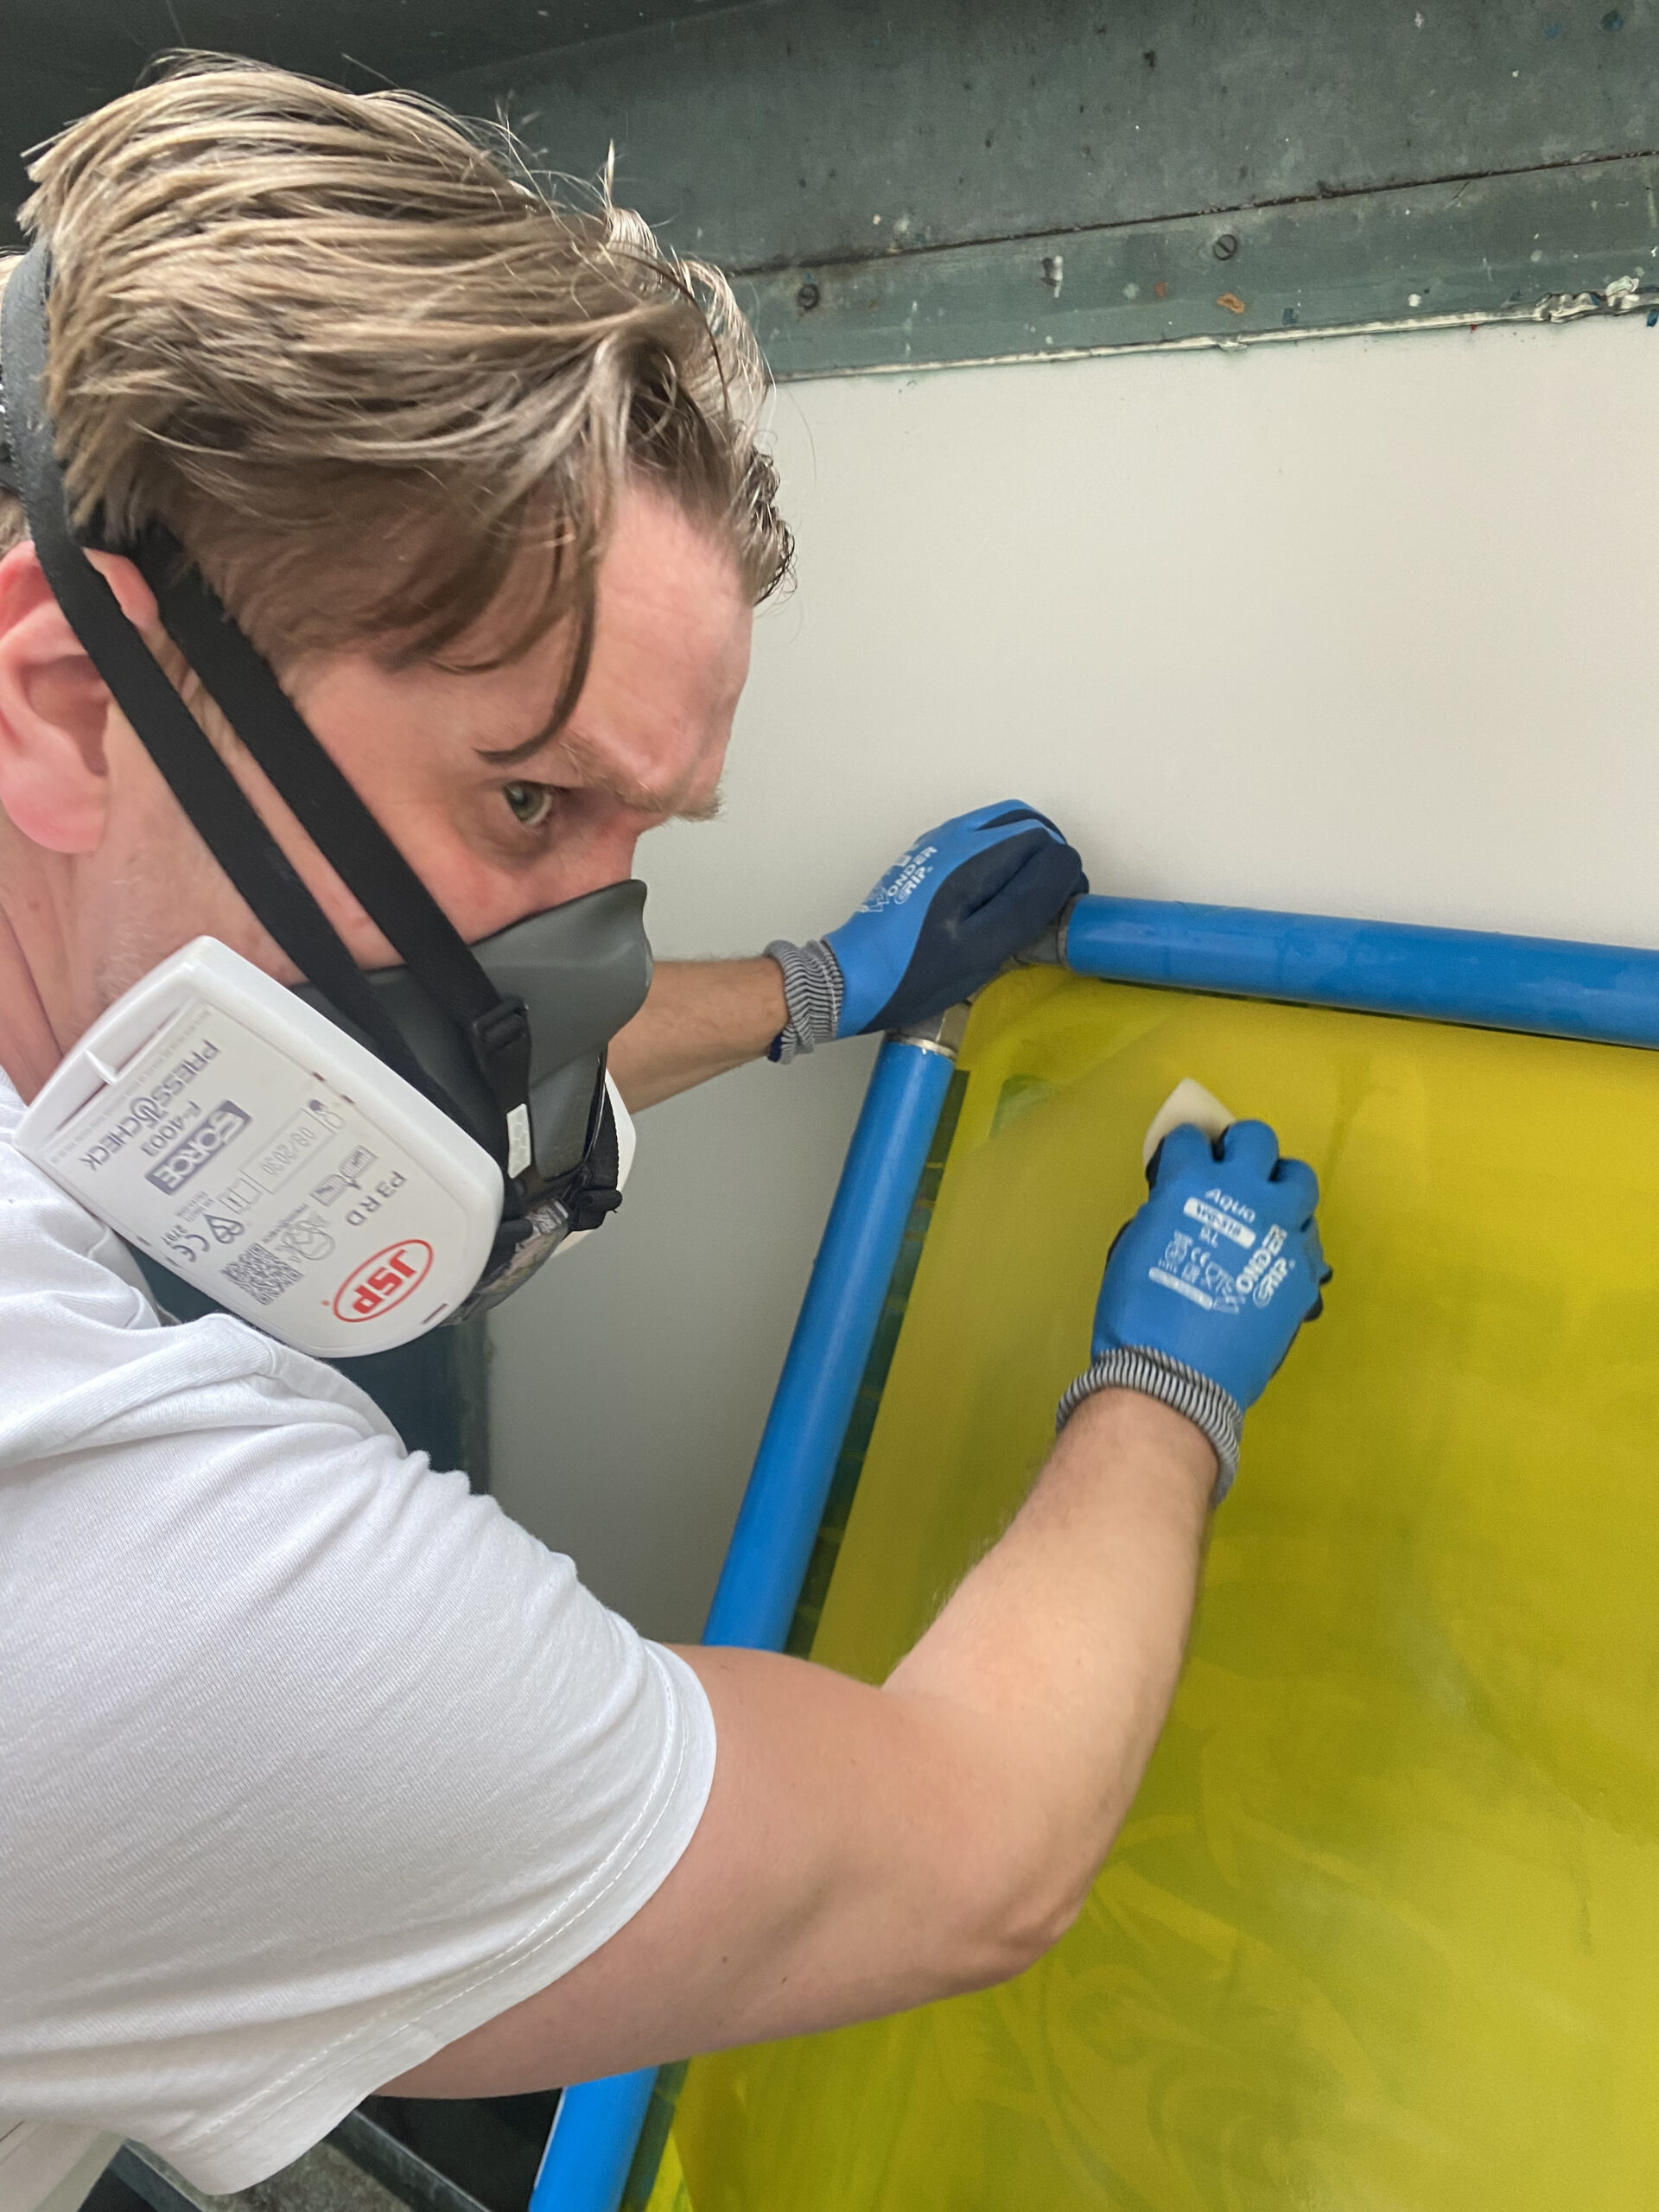
Each screen has to go through the same process each and every time to prepare it for emulsion coating. It’s extremely important that any old ink and emulsion is removed from previous print runs and that the mesh is degreased and rinsed before drying in a warm, dust free environment. Only when the mesh is completely dry is it ready to apply the photosensitive emulsion.
Emulsion is applied by hand (manually) or with the use of an auto-coater. The number of coats depends on a few variables. These are mainly the mesh coarseness, the ink being used (desired thickness) and again, the detail in the artwork. Once emulsion is applied, the screens are dried again for approximately 30-40 minutes at around 40 degrees C.
Step 3: Exposing the Screen/Creating a Stencil
There are many ways to expose an image onto the screen, however likely the most popular and widely used is the use of positive film. The film is printed using an inkjet printer or image setter. A film is aligned on each of the emulsion-coated screens and they are exposed using bright UV lights. The light hardens the emulsion where there is no image and stays soft under the positive image where it has not been exposed. The image can then be washed out, creating the stencil before the screen is dried again and is finally ready to use on the press.
Step 4: Screen Registration
If your design is a single colour print on a light garment or bag then the screen is taped up and placed on the press in the correct position. If your design has more than one colour then each screen has to be registered on the press so the colours are printed exactly as the original artwork. Ink colours are selected and test prints are made before full production begins.
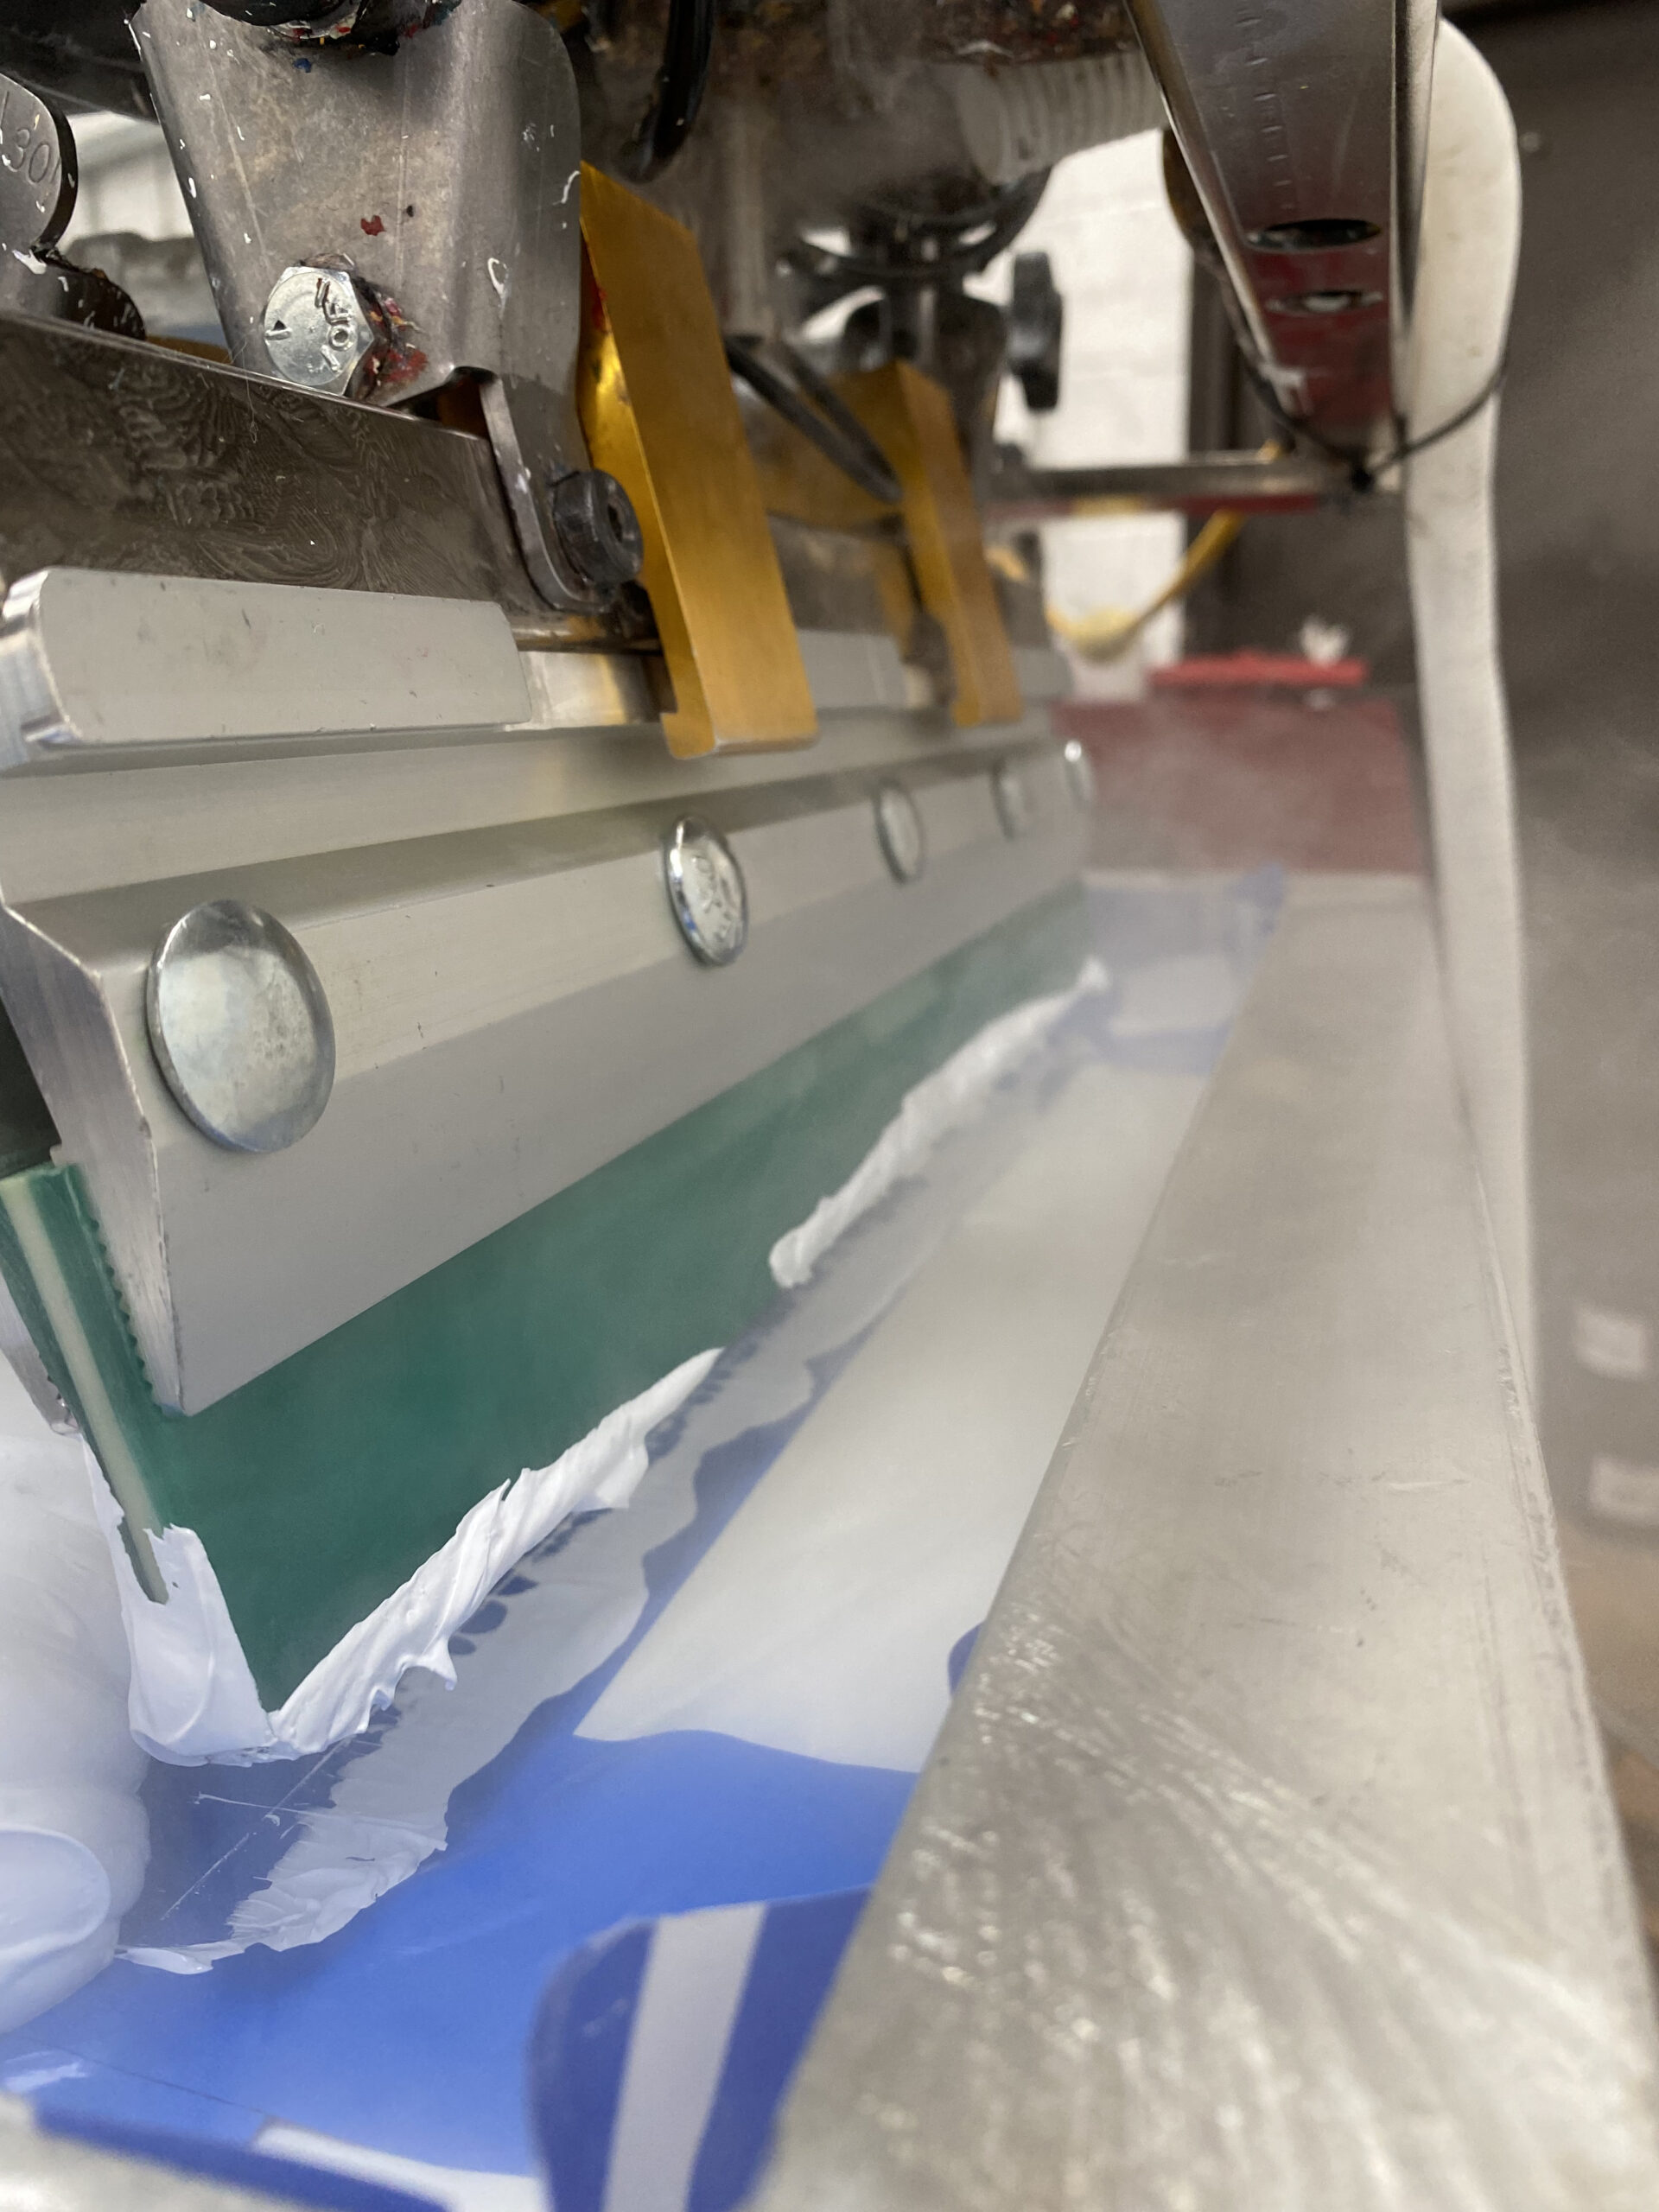
Step 5: Printing
Using a manual or automatic press, garments being printed have to be flat, so each one is laid down on the lightly tacked press platens or boards. One type of press is not necessarily better than another, but for speed and repetition, an automatic press will be used to print large orders. An auto-press takes out nearly all human error and is capable of printing multi-coloured designs quickly. Each pre-registered screen is lowered to the garment and ink is pushed through the open areas of the stencil from the top side using a squeegee. The design comes to life on the garment!
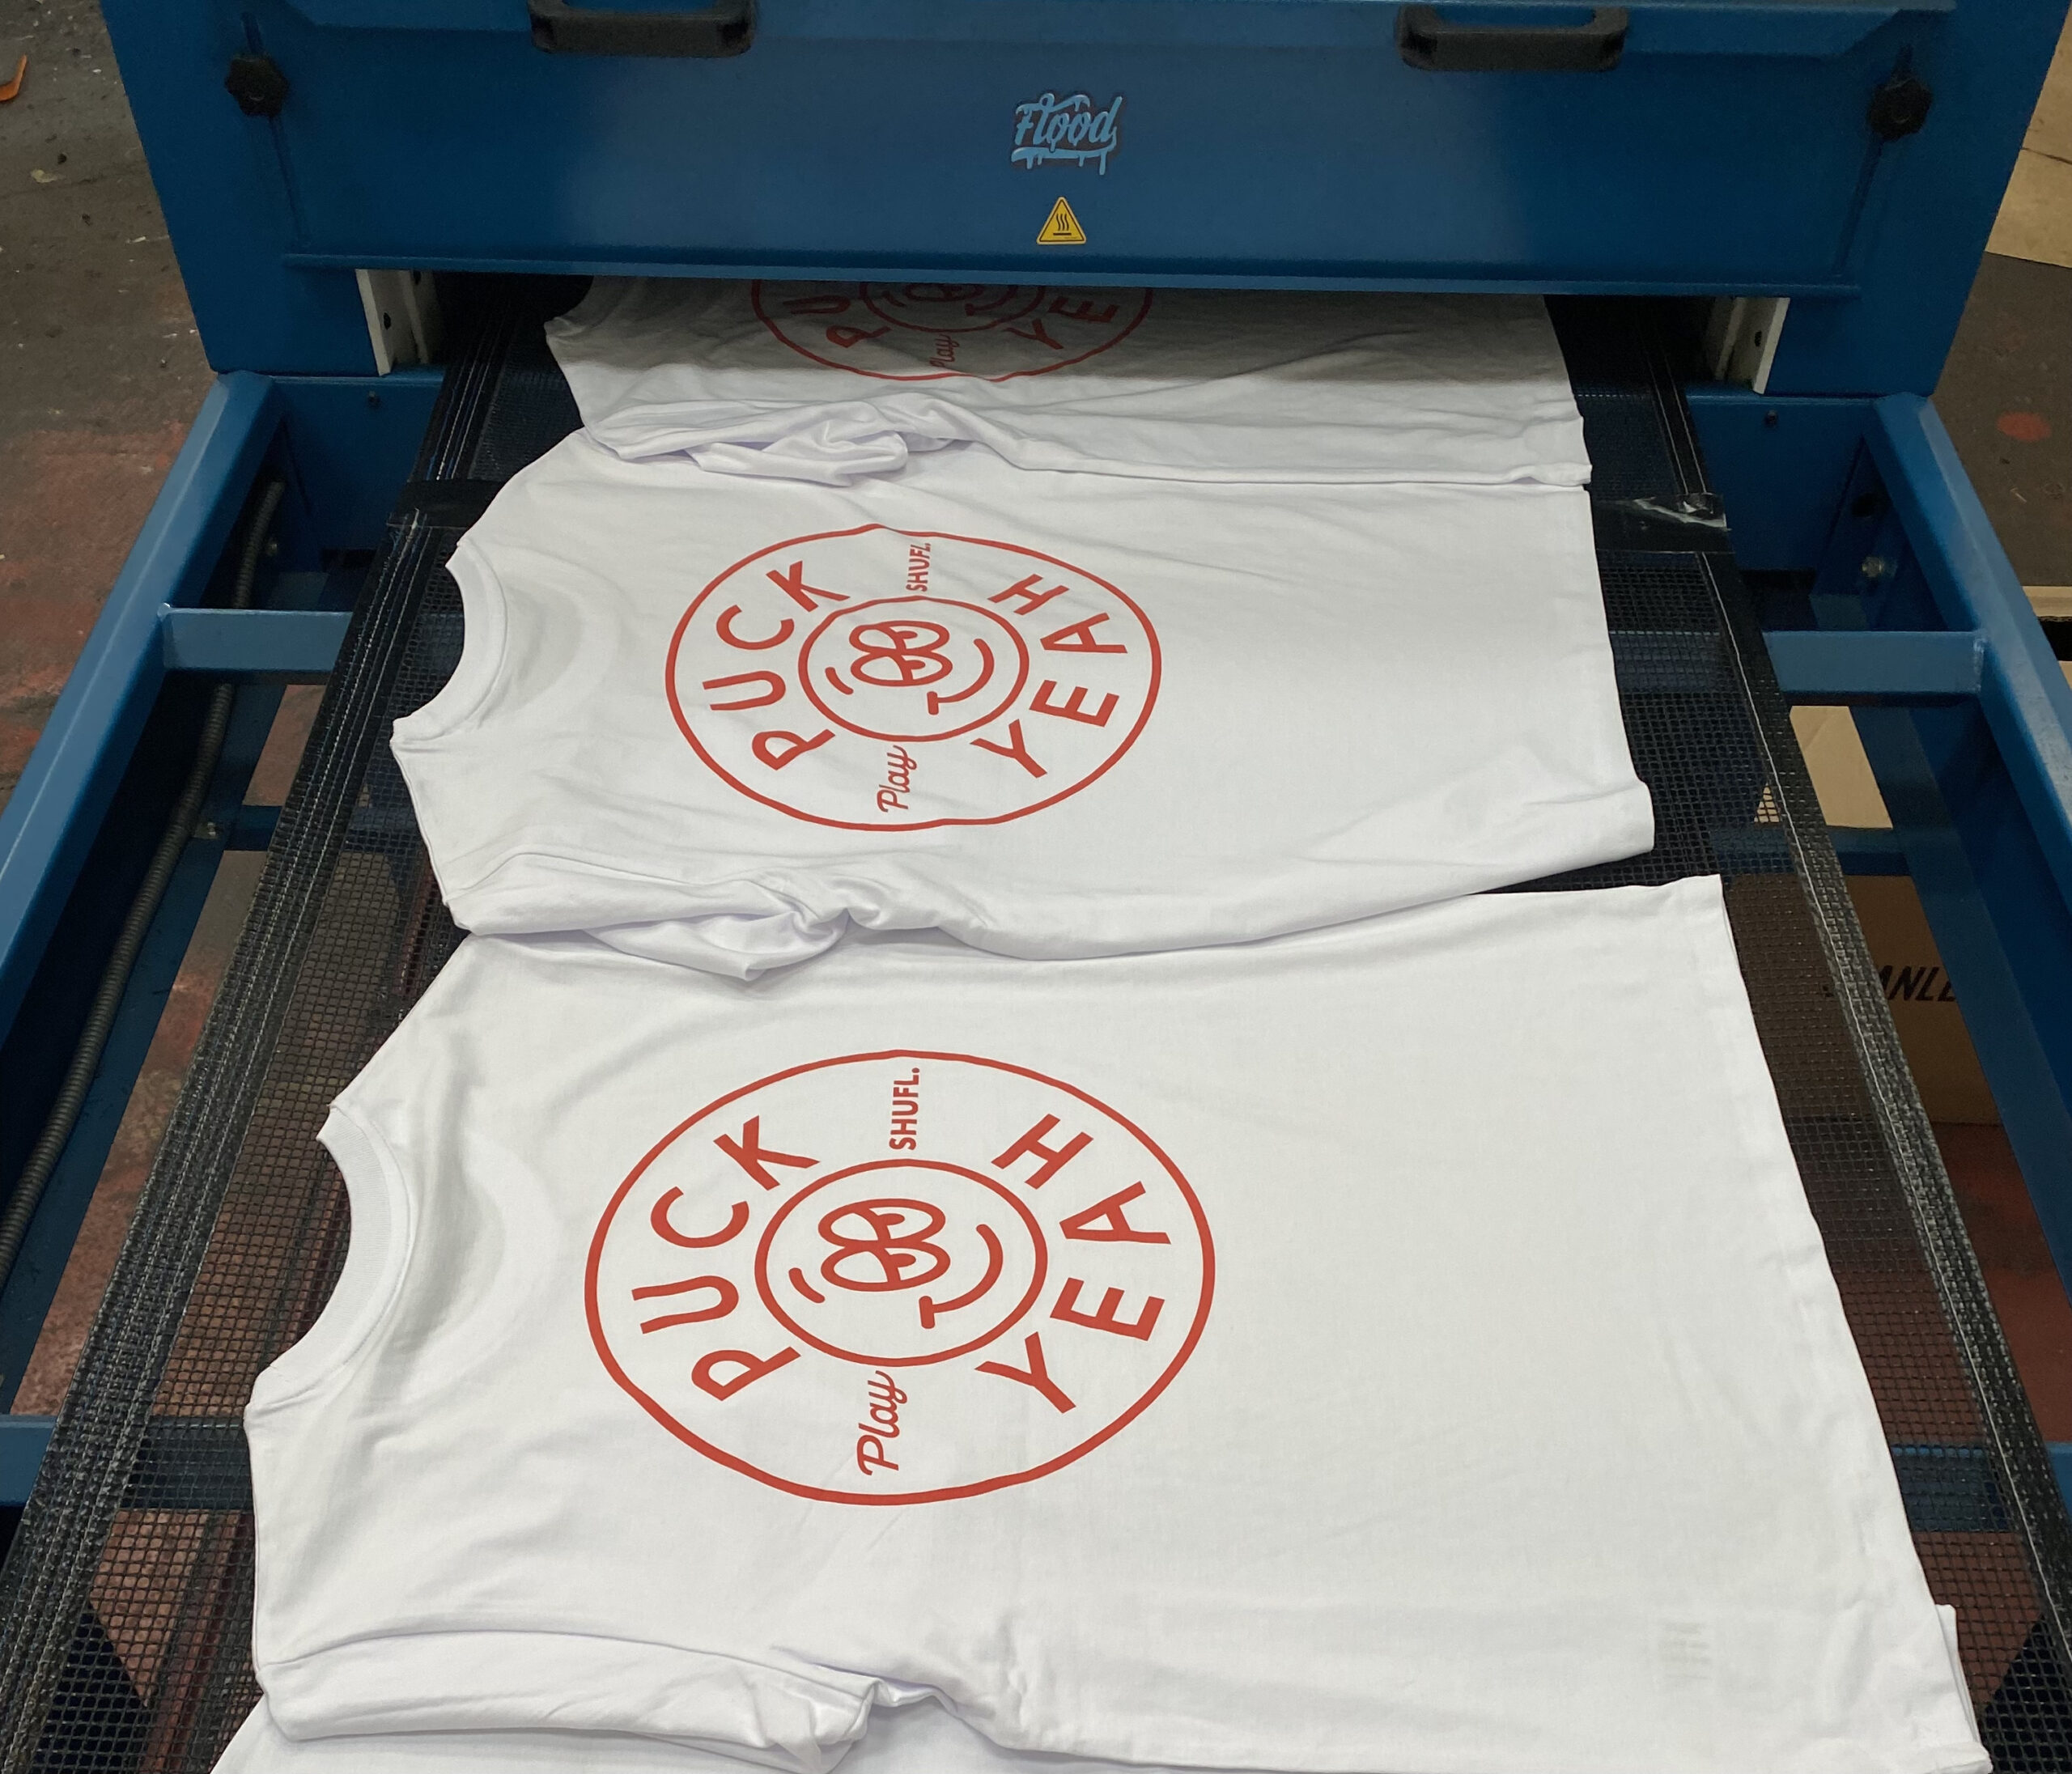
Step 6: Drying or Curing
In order to make sure your design lasts the test of time, it’s essential the ink is cured or dried. Whether your design is printed using water-based, discharge or plastisol inks, the basic process is the same. The freshly printed garment is sent through a large industrial dryer to ensure a bright, smooth and durable print.
Screen Printing Equipment
As mentioned previously, screen-printed graphics can be applied to all sorts of substrates. We’re concentrating on garment decoration so we will focus on equipment used for printing T-shirts, sweatshirts, hoodies, bags and everything in between.
With a bit of time and effort, pretty much anyone can print a T-shirt. All they need is a few basic pieces of equipment and space to print in. On a very small scale or just a DIY setup, you’ll need the following; A screen, a squeegee, ink and some blank T-shirts. A stencil can be made by cutting a piece of film, or if you have the tools to do it, exposing a screen with emulsion. There are even inks that air dry if you don’t have the equipment to cure the print.
As the production quantities get higher and the artwork gets more complex, so does the quality of the equipment and machinery used. A well maintained manual carousel, paired with a skilled operator can produce some very high quality work but for precision and speed an automatic screen printing press is a must. Two people using a manual press, printing one colour will output around 100-150 prints per hour. Whereas multi-coloured prints on an automatic press can be produced at up to 1,000 pcs per hour.
Washout Booth: Large wet area for degreasing and reclaiming screens
Silk Screens: High tensioned mesh stretched over a wooden or metal frame
Scoop Coater: Tool to apply emulsion to meshed screens
Emulsion: Photosensitive chemical applied to screens to create a stencil
Exposure Unit: UV, Metal Halide or LED light for exposure
Film Positives: Clear film printed with a light blocking black in
Inks: Plastisol, Discharge, Water based and Special Fx
Screen Printing Press/Carousel: 6 – 14 colours – Can be manual, semi-automatic or automatic
Squeegee: Rubber blade clamped into metal or wooden holder
Flash Dryer: Used to dry an underbase or in between colours on press
Conveyor or Tunnel Dryer: Electric or Gas dryer used to cure printed screen inks
A Brief History of Screen Printing:
Screen Printing is said to have originated in China over 1,000 years ago and although the equipment has improved significantly, the fundamentals are still the same. During the Song Dynasty it was a popular way of transferring patterns onto fabrics. Close neighbours in Japan also started using simple stencil techniques to print basic images onto fabric. Stencils were sometimes cut from paper or cloth and the mesh screens were made using human or animal hair. Natural pigment dyes (inks) were then pushed through the stencil with a stiff brush to produce an image.
It wasn’t until the late 17th, early 18th Century that the techniques became popular in Europe. The French began weaving silk to produce screens but still used brushes to push the ink through the mesh onto fabric. This eventually evolved into silk being stretched tightly over wooden frames, allowing improvements in the quality of the image being printed.
Skip forward to the early 1900’s, and the first record of squeegees being used to pull ink through the silk screen mesh. This really helped revolutionise screen printing commercially and when Roy Beck, Edward Owens and Charles Peter introduced photosensitive emulsions, the industry took a giant leap towards.
In 1938 a group of artists formed the National Serigraph Society and coined the term Serigraphy (“seri” silk in Latin and “graphein” to draw in Greek) as a way to differentiate their own artistic application of screen printing on to paper from the industrial, commercial use of the process. These techniques inspired the famous pop artists of the 1960’s that we’re all familiar with today. Pop artists such as Peter Blake, Andy Warhol and Roy Lichtenstein used screen printing to reproduce art on a large scale.
At approximately the same time Michael Vasilantone was creating the first screen printing carousel, a multi-colour garment screen printing machine. Since the 60’s popularity in printed T-shirts has grown and grown, and although technology has advanced his patented creation is still the basis of equipment used today.
The modern screen printer has a unique mix of artistic and scientific knowledge. Since the 1980’s, high detailed band shirts and clothing brand artwork has been reproduced as screen prints. With technology continuously improving and the availability of high end computer software, screen printing is here to stay! Although digital printing techniques have been available for a number of years, they have not yet replaced traditional screen printing and for large volume orders, are yet to match up.
Screen printing is a great way to customize clothing and other items with unique designs. With the right equipment, you can create high-quality prints that will last for years. Whether you choose to use manual or automatic presses, it’s important to have quality products such as screens, inks, emulsion, and film positives so your design stands out from the rest. By using these tools properly and following all of the steps outlined above, you’ll be able to produce beautiful screen-printed garments every time!
We also offer a range of other services such as transfer printing, dtg printing and embroidery.